Living in Eastern Oregon means dealing with unique environmental challenges that can significantly impact your vehicle’s longevity. The combination of moisture, temperature fluctuations, and occasional road salt creates the perfect storm for rust and corrosion. Whether you’re in La Grande, OR or anywhere else in this region, understanding how to protect your car from these damaging elements is essential for maintaining its value and safety.
Rust and Corrosion in Eastern Oregon’s Climate
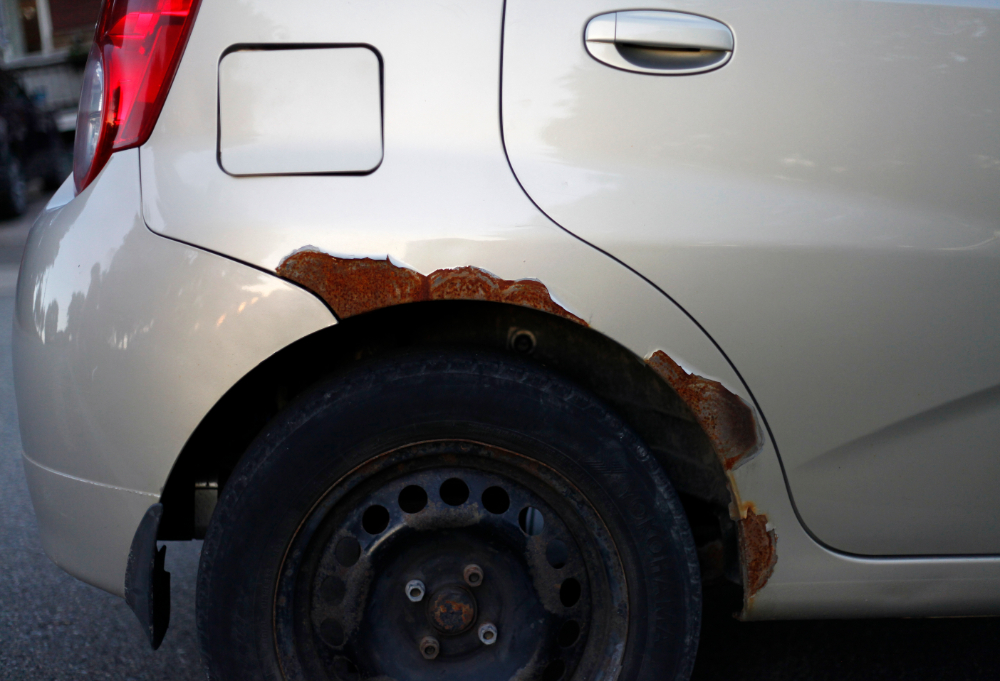
The Eastern Oregon climate presents specific conditions that accelerate rust and corrosion on vehicles. Winter months bring moisture and occasional freezing rain, while spring and summer can introduce unexpected temperature swings. Road salt used during icy conditions is one of the most aggressive culprits, chemically attacking metal surfaces on your car’s undercarriage and exterior.
Rust forms when iron in steel reacts with oxygen and moisture. Corrosion is a broader term that includes rust and other forms of chemical deterioration. In Eastern Oregon, the altitude and climate patterns create an environment where both processes accelerate faster than in lower-elevation regions. The dry summer air followed by wet winter conditions means your vehicle experiences constant exposure to moisture and subsequent drying cycles that weaken protective coatings.
Understanding these environmental factors helps you appreciate why rust prevention in La Grande and the surrounding area requires proactive measures. Your car doesn’t just need occasional washing; it needs comprehensive protection strategies tailored to our regional climate.
Regular Washing and Undercarriage Cleaning
The most fundamental step in car corrosion protection is keeping your vehicle clean. Regular washing removes salt, dirt, and chemical residues that accumulate on your car’s surface. However, many vehicle owners focus only on the visible exterior while neglecting the undercarriage, where corrosion begins most aggressively.
In Eastern Oregon, where road salt is common during winter, undercarriage cleaning becomes critically important. The underside of your vehicle is constantly exposed to salt spray, mud, and moisture from the roads. This creates an ideal environment for rust to develop on crucial components like suspension parts, brake lines, and the frame.
Wash your vehicle every two weeks during winter months, focusing especially on the undercarriage. If your local car wash doesn’t offer undercarriage cleaning, consider taking your car to a facility that does or using a pressure washer at home. Pay special attention to wheel wells, fenders, and areas where mud and salt tend to accumulate.
During spring and fall, when weather transitions between seasons, increase your washing frequency. This prevents the buildup of winter salt residue and removes debris that traps moisture against metal surfaces. Don’t forget to clean the interior as well; moisture inside your vehicle can contribute to corrosion of interior components and the underside of the roof.
Applying Protective Coatings and Sealants
Beyond washing, applying protective coatings provides a crucial barrier against rust and corrosion. Paint sealants, ceramic coatings, and wax create a protective layer that prevents moisture and salt from reaching the underlying metal. For serious auto body maintenance in La Grande, many professional detailers offer these specialized services.
Ceramic coatings offer superior protection compared to traditional wax, lasting anywhere from one to five years depending on the product. These coatings chemically bond to your clear coat, creating a hydrophobic surface that repels water and prevents contaminant adhesion. While more expensive initially, ceramic coatings provide excellent long-term value in Eastern Oregon’s challenging climate.
Undercoating your vehicle provides protection specifically for the undercarriage and hidden components. Professional undercoating creates a rubberized barrier that prevents salt and moisture from contacting metal surfaces directly. Apply undercoating before winter arrives, as this is when your vehicle will face the harshest conditions.
Don’t overlook the importance of touch-up paint. Small chips and scratches expose bare metal, which rusts quickly when exposed to moisture and salt. Keep paint touch-up pens matching your vehicle’s color in your car and apply them promptly whenever you notice damage.
Maintaining Your Vehicle’s Drainage Systems
Water accumulation in hidden areas of your vehicle is a primary cause of rust formation. Your car has multiple drainage systems designed to direct water away from critical components. When these systems become clogged with debris, water pools in areas where it shouldn’t be, accelerating corrosion.
Check your vehicle’s weatherstripping around doors and windows regularly. Worn or damaged weatherstripping allows water to enter the passenger compartment and hidden cavities within the vehicle’s structure. Replace weatherstripping before winter to ensure proper water management.
Inspect the drainage holes along your roofline, door frames, and undercarriage. These small openings prevent water from accumulating in areas where you can’t see it. Clear any debris, leaves, or dirt that might clog these important drainage points.
The sunroof area is another common problem spot for water accumulation. Check that sunroof drains are functioning properly, as clogged drains lead to water leaking into the vehicle’s interior and hidden frame areas. If you notice water pooling anywhere inside your vehicle, address it immediately before it causes extensive rust damage.
Professional Inspection and Early Intervention
Regular professional inspections catch rust and corrosion problems before they become major issues. Many automotive shops in Eastern Oregon, including those throughout La Grande, offer comprehensive inspections that identify early signs of corrosion and rust development.
During a professional inspection, mechanics check areas you might miss, including the frame, suspension components, brake lines, and fuel system. They can identify surface rust before it becomes structural rust, which is far more serious and expensive to repair.
Early intervention is key to effective rust prevention and car corrosion protection. A small spot of surface rust can be treated with rust converter or sanded and repainted. However, structural rust that has compromised the integrity of your vehicle’s frame or critical components can cost thousands of dollars to repair or may make the vehicle unsafe.
Schedule professional inspections at least annually, preferably before winter arrives. If you notice any unusual bubbling in the paint, visible rust spots, or unusual sounds from the undercarriage, have your vehicle inspected immediately rather than waiting for a scheduled appointment.
Seasonal Preparation Strategies
Each season in Eastern Oregon brings different challenges for rust prevention. Preparing your vehicle appropriately for seasonal transitions significantly extends its lifespan and maintains its value.
Before winter, apply a protective coating to the undercarriage, check your weatherstripping, and ensure all drainage systems are clear. Consider waxing your entire vehicle or applying a ceramic coating to provide maximum protection during the harsh winter months when road salt is most prevalent.
As spring arrives, thoroughly wash your vehicle to remove accumulated winter salt and road treatment chemicals. This is an ideal time to inspect for any rust damage that may have developed during winter and address it before it worsens.
Summer offers an opportunity to maintain your protective coatings and ensure your vehicle is in optimal condition. Fall preparation involves checking weatherstripping again and cleaning out drainage systems before winter returns.
Conclusion
Protecting your vehicle from rust and corrosion in Eastern Oregon requires a comprehensive, year-round approach. By understanding the unique climate challenges of our region, you can implement effective strategies that preserve your car’s structural integrity, appearance, and value. Regular washing with emphasis on undercarriage cleaning, professional protective coatings, maintained drainage systems, and seasonal preparations form the foundation of successful rust prevention in La Grande and throughout Eastern Oregon.
Auto body maintenance tailored to our regional climate isn’t just about aesthetics; it’s about safety and long-term vehicle reliability. The investment you make today in proper car corrosion protection will save you thousands of dollars in repairs down the line. By following these guidelines and staying proactive about your vehicle’s protection, you can confidently drive through Eastern Oregon’s challenging weather while knowing your car is properly protected against rust and corrosion.
Need a Mechanic in La Grande, OR?
Our team here at Integrity Automotive has provided quality auto repair services for our customers since 2003. We are a full service auto repair shop and specialize many types of vehicles, including European models such as BMW and Audi, as well as diesel trucks. Our services include engine repair, transmission services, and many more services. Moreover, we are ASE certified and are a proud member of NFIB, and we are a certified NAPA auto care center. Call or come in for immediate service!
Driving in Eastern Oregon comes with a unique set of challenges. Wide-open landscapes, scenic backroads, and long rural highways make the region beautiful to explore, but they also place significant stress on vehicles. Residents in La Grande, Union County, and surrounding communities often travel miles of gravel roads, uneven pavement, and rough terrain every week. Over time, these driving conditions can affect critical vehicle components, especially the suspension and alignment systems.
For rural drivers such as farmers, delivery drivers, loggers, and small business owners, a reliable vehicle is essential for daily life and work. When suspension components begin to wear down or a vehicle falls out of alignment, the effects can quickly become noticeable. Steering may feel unstable, tires may wear unevenly, and the ride may become rougher than usual.
Addressing these issues early through professional suspension repair in Eastern Oregon can help drivers maintain vehicle safety and prevent expensive long-term damage. At Integrity Automotive, technicians understand how rural road conditions affect vehicles and provide services designed to keep cars and trucks performing reliably on the demanding roads of Union County.
How Rural Roads Impact Suspension and Alignment
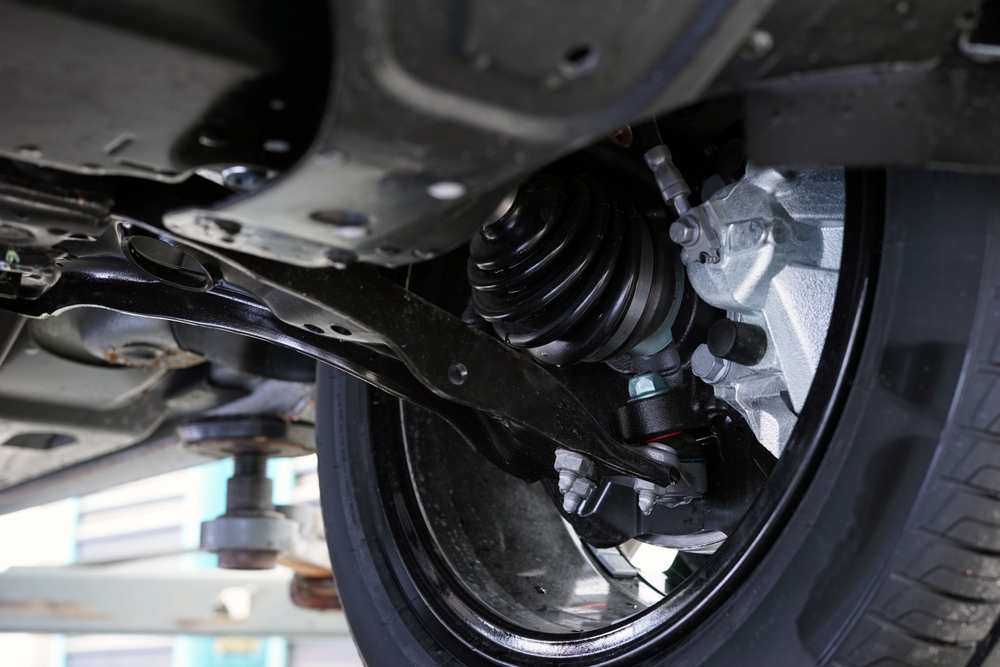
Rural roads in Eastern Oregon are far different from the smooth urban highways found in larger cities. Gravel surfaces, potholes, uneven shoulders, and dirt roads can place repeated stress on suspension systems. Each bump or dip in the road sends force through the vehicle’s frame, affecting components such as shocks, struts, springs, and steering linkages.
Over time, this constant stress can cause suspension parts to loosen or wear down. Even small changes in suspension geometry can alter how the tires contact the road. When this happens, wheel alignment gradually shifts away from the manufacturer’s specifications.
Wheel alignment refers to the precise positioning of the wheels in relation to the vehicle’s body and suspension system. When alignment is correct, tires meet the road at the proper angles, allowing the vehicle to travel straight while maintaining stable handling.
Driving on rough rural terrain can slowly push wheels out of alignment. A hard impact with a pothole or large rock can also cause immediate misalignment. For drivers who frequently travel backroads or gravel routes, regular checks for car alignment near Union County become an important part of rural road vehicle maintenance.
Signs Your Vehicle May Need Suspension or Alignment Service
Suspension and alignment problems often begin with subtle warning signs. Drivers may notice that their vehicle does not feel quite the same as it once did. These changes can appear gradually, especially when rough roads are part of everyday travel.
One of the most common indicators is uneven tire wear. When alignment is off, tires do not make uniform contact with the road surface. As a result, certain areas of the tire tread wear down more quickly than others. This uneven wear shortens tire lifespan and can eventually lead to reduced traction.
Another common sign involves steering behavior. If a vehicle pulls to one side while driving on a straight road, it may indicate that wheel alignment has shifted. Drivers may also feel vibrations in the steering wheel, particularly at higher speeds.
Suspension problems often create a noticeably rough ride. Worn shocks or struts may struggle to absorb bumps effectively, causing the vehicle to bounce excessively after hitting uneven terrain. Drivers may also hear clunking noises when driving over rough roads, which can indicate loose suspension components.
These symptoms should not be ignored. Addressing them early through professional auto suspension service can prevent further damage and restore proper vehicle handling.
Integrity Automotive helps drivers throughout La Grande and Union County identify these warning signs and recommend the appropriate repairs to keep vehicles operating safely.
Why Proper Alignment Protects Tires and Vehicle Performance
Wheel alignment plays a major role in both vehicle performance and tire longevity. When the wheels are properly aligned, the tires meet the road evenly, distributing weight across the entire tread surface. This balanced contact helps maintain stable steering and smooth handling.
When alignment shifts, however, tires begin to wear unevenly. Certain areas of the tread may experience excessive friction, leading to premature wear. In some cases, tires that should last tens of thousands of miles may require replacement much sooner.
Correct alignment also improves fuel efficiency. Misaligned wheels create additional rolling resistance, forcing the engine to work harder to maintain speed. Over time, this increased strain can raise fuel consumption and add unnecessary stress to other components.
Drivers who frequently travel rural roads often benefit from periodic alignment checks. Even minor adjustments can restore proper wheel positioning and extend tire life. For vehicles used in agricultural work, deliveries, or outdoor recreation, maintaining alignment becomes especially important.
Integrity Automotive uses modern diagnostic equipment to ensure precise wheel alignment for a wide range of vehicle types. Their technicians carefully measure wheel angles and make adjustments that help vehicles perform reliably on both paved highways and rough backroads.
The Role of Shocks and Struts in Vehicle Safety
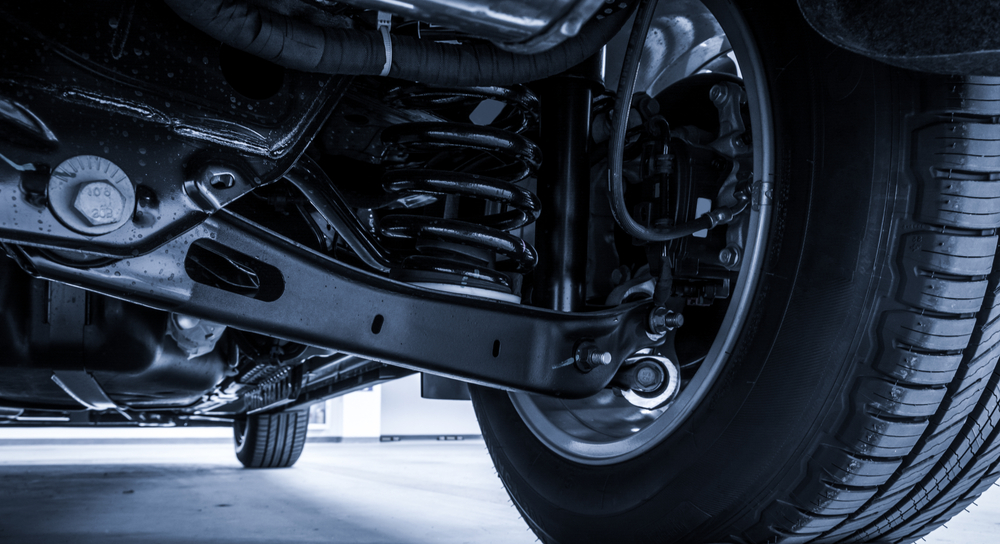
Shocks and struts are essential components of a vehicle’s suspension system. Their primary role is to control how the vehicle responds to bumps, dips, and uneven terrain. By absorbing and dampening road impacts, they help maintain consistent tire contact with the ground.
When shocks and struts wear out, the vehicle becomes less stable. Excessive bouncing after hitting bumps is a common sign that these components are no longer performing effectively. Drivers may also notice longer stopping distances, especially when braking on uneven surfaces.
For rural drivers in Eastern Oregon, these issues can become particularly concerning. Gravel roads and winding highways require reliable traction and steering control. Worn suspension components reduce the vehicle’s ability to respond to sudden changes in road conditions.
Shock and strut repair plays a crucial role in maintaining vehicle safety on rural Oregon roads. Replacing worn components helps restore stability and ensures that tires remain firmly planted on the road surface.
Integrity Automotive technicians regularly perform suspension inspections to evaluate the condition of shocks, struts, and related components. Their experience working with vehicles exposed to rough terrain allows them to identify issues early and recommend appropriate repairs.
Preventing Costly Repairs with Regular Maintenance
Preventative maintenance is one of the most effective ways to protect a vehicle from expensive repairs. Suspension and alignment systems often experience gradual wear rather than sudden failure. By addressing small problems early, drivers can avoid larger mechanical issues down the road.
Routine inspections help technicians detect worn components before they cause additional damage. For example, replacing a worn shock absorber early may prevent excessive stress on tires, springs, and other suspension parts.
Drivers who frequently travel gravel roads or uneven terrain should consider scheduling regular alignment checks as part of their rural road vehicle maintenance routine. These checks help ensure that wheel positioning remains accurate even after extended exposure to rough driving conditions.
Integrity Automotive has earned a strong reputation throughout La Grande and Union County for providing honest, dependable service. Their certified technicians combine local knowledge with advanced diagnostic tools to deliver accurate suspension and alignment repairs.
Understanding the challenges of Eastern Oregon roads allows them to provide personalized recommendations tailored to each customer’s driving habits. Whether the vehicle is used for farm work, business deliveries, or daily commuting, their team focuses on maintaining long-term reliability and safety.
Maintaining proper suspension and alignment is about more than comfort. It plays a critical role in tire wear prevention, vehicle stability, and overall driving safety. For residents of Union County and surrounding rural communities, regular maintenance helps ensure that vehicles remain dependable even on the toughest roads.
With expert suspension repair in Eastern Oregon and precise wheel alignment services, Integrity Automotive continues to support drivers who rely on their vehicles every day. Their commitment to quality workmanship and community trust helps keep Eastern Oregon drivers safely on the road for miles to come.
Driving in Oregon presents a unique set of challenges, especially when navigating between mountain roads and expansive highways. Whether you’re exploring the Wallowa Mountains, heading toward Mount Hood, or simply commuting on I-84 through La Grande, your vehicle’s tires are your first line of defense against hazards on the road. While many drivers are aware of the need for oil changes and brake checks, tire inspections are often overlooked. However, understanding the role tires play in safety, performance, and vehicle diagnostics is critical, particularly in Oregon’s diverse climate and terrain. This article will explore why tire inspections are essential for both mountain and highway driving, how they connect with dashboard warning lights, and what steps you should take to ensure your tires are always ready for the road.
Mountain Terrain Demands Strong Tire Health
Oregon’s mountainous regions are as breathtaking as they are unpredictable. The sharp curves, steep inclines, sudden weather changes, and rough terrain found in places like the Blue Mountains or Cascade Range can quickly push your vehicle’s tires to their limits. In these conditions, proper tire maintenance is not optional; it’s a safety requirement. Tires with low tread depth, uneven wear, or damage are far more susceptible to losing traction, especially on snow or gravel-covered roads. The consequences can range from loss of control to total blowouts, both of which are significantly more dangerous on a mountainside than on flat land.
Elevation changes also put stress on tire pressure. Air expands and contracts with altitude and temperature fluctuations, meaning your tire pressure could be at an ideal level in the valley and dangerously low at higher altitudes. If you’ve ever asked, “What does my dashboard warning light mean?” after seeing a tire pressure symbol illuminate, it’s likely related to these exact conditions. Ignoring such alerts, especially while driving in mountainous areas, can lead to compromised handling and decreased braking efficiency.
Highway Driving Requires Endurance and Reliability
Long-distance driving on Oregon’s highways such as I-5, US-97, or US-26 demands consistent performance from your tires. While highway conditions might seem safer than mountain roads, they come with their own set of risks. High speeds increase heat buildup in the tires, which can exacerbate wear and tear or existing damage. A minor issue like a slow leak or slight tread separation could escalate into a major hazard when traveling at 65 miles per hour or more.
Routine tire inspections help catch these problems early. A visual inspection might reveal small punctures or embedded debris that has not yet caused a noticeable drop in pressure. Furthermore, tire rotations and alignments keep tread wear even, preserving your car’s performance and reducing the risk of sudden tire failure. Many drivers in areas like La Grande, OR are familiar with dashboard warning lights that seem to activate at the worst possible time. A properly maintained tire setup reduces the chances of these inconvenient and potentially dangerous surprises.
Tire Pressure Monitoring and Dashboard Warning Lights
Modern vehicles come equipped with Tire Pressure Monitoring Systems (TPMS) that alert drivers when tire pressure falls outside of optimal levels. This is a vital feature when navigating Oregon’s varying elevations and temperatures. Still, the appearance of a TPMS icon is often ignored or misunderstood. Some drivers wonder, “What does my dashboard warning light mean?” and assume it can wait until their next scheduled service.
This is a dangerous assumption. Underinflated tires are more prone to overheating, reduced fuel efficiency, and poor braking response. Overinflated tires, on the other hand, can lead to reduced traction and increased risk of a blowout. In either case, you’re compromising your vehicle’s performance and your own safety. The TPMS is not just a convenience feature but a direct warning system meant to alert you before a minor issue becomes a major one.
Dashboard warning lights are not limited to tire pressure. The check engine light can also appear due to a range of issues, some of which may be connected to the drivetrain and suspension systems affected by tire condition. In La Grande, OR, where drivers may encounter long, isolated stretches of highway, it’s important to address any car warning lights meaning without delay. A tire inspection is often the first and easiest step in diagnosing and resolving these alerts.
Seasonal Considerations in Oregon’s Driving Conditions
Oregon drivers experience all four seasons in their full intensity. From icy winter roads in the mountains to summer heat on the highways, each season brings different demands on your tires. Winter tires are recommended for mountain driving from late fall through early spring. Their specialized rubber compounds and tread patterns offer enhanced grip on snow and ice. However, these same features can wear down quickly on dry summer roads.
A seasonal tire inspection helps ensure you’re using the right tire for the right conditions. Summer heat can cause tire pressure to rise rapidly, increasing the risk of a blowout if your tires are already compromised. Conversely, cold weather causes tire pressure to drop, which can trigger dashboard warnings and reduce your vehicle’s stability on slick surfaces. Performing tire checks as the seasons change is one of the best preventative measures you can take, especially in a state as geographically and climatically diverse as Oregon.
If you’ve ever driven through snow one week and into 90-degree heat the next, as is possible in regions like eastern Oregon, you understand how essential it is to keep your tires prepared for anything. Whether you’re responding to a check engine light or trying to understand why a tire warning icon has appeared, your first response should be a thorough inspection.
Choosing the Right Tires and Knowing When to Replace Them
Understanding tire inspections also involves knowing when it’s time to replace your tires entirely. Tread depth is a critical indicator of tire health. In Oregon, where roads can shift from wet to dry to icy in a single trip, worn treads can drastically reduce your grip. If your tires are nearing the legal limit of 2/32 of an inch or show signs of cupping, cracking, or sidewall damage, replacement is not just recommended but necessary.
In addition to inspections, choosing the correct tire for your driving style and region is key. All-season tires may suffice for drivers in the Willamette Valley but may fall short for those frequently traversing the Cascades. Likewise, performance tires might be great for summer highway driving but will underperform in winter conditions. An informed tire choice, backed by regular inspections, contributes to fewer dashboard warning lights and better peace of mind.
When you ignore tire wear, it’s not just a question of vehicle performance. It can lead to increased braking distances, poor handling, hydroplaning in wet weather, and tire blowouts that could result in accidents. In towns like La Grande, OR, where professional assistance may be limited while on the road, proactive tire care is especially important.
Conclusion
Tire inspections are one of the most effective, affordable ways to enhance safety and reliability when driving across Oregon’s varied landscapes. Whether you’re climbing steep mountain passes or cruising long highway stretches, your tires must be in top condition. Routine checks help you identify wear patterns, pressure issues, and other damage before they escalate into serious problems.
Understanding the meaning behind dashboard warning lights is part of being a responsible vehicle owner. If you’re wondering, “What does my dashboard warning light mean?” or dealing with a check engine light in La Grande, OR, consider that your tires may be a contributing factor. Car warning lights meaning should never be left to guesswork, especially when the fix could be as simple as a tire inspection or pressure adjustment.
In a state where weather and road conditions can change rapidly, maintaining your tires is not just about extending their lifespan. It’s about protecting yourself, your passengers, and everyone you share the road with. Make tire inspections a regular part of your vehicle maintenance routine, and you’ll be better prepared for every journey, no matter where Oregon takes you.
Need a Mechanic in La Grande, OR?
Our team here at Integrity Automotive has provided quality auto repair services for our customers since 2003. We are a full service auto repair shop and specialize many types of vehicles, including European models such as BMW and Audi, as well as diesel trucks. Our services include engine repair, transmission services, and many more services. Moreover, we are ASE certified and are a proud member of NFIB, and we are a certified NAPA auto care center. Call or come in for immediate service!
Modern vehicles are smarter than ever, equipped with advanced sensors and electronic systems designed to keep drivers informed about potential issues. But for many, the sudden appearance of a dashboard warning light can feel like a cryptic message from the car’s computer. Understanding these symbols is critical for safe driving and can help prevent small problems from escalating into expensive repairs. If you’re driving around La Grande, OR, and see a light flicker on, don’t panic just yet. Let’s break down what your dashboard warning lights are really telling you and when it’s time to take action.
What Does My Dashboard Light Mean?
When you start your car, you might notice several lights flashing briefly across your dashboard. This is normal, as the vehicle performs a quick system check. These lights usually turn off after a few seconds. However, if a warning light stays on or appears while you’re driving, it’s time to pay attention.
Each dashboard warning light is color-coded to signify the urgency of the issue. A red light typically means there’s a serious problem that needs immediate attention, such as low oil pressure or a brake system failure. A yellow or orange light suggests something needs service soon but may not be urgent. Green or blue lights are generally informational, like high-beam indicators or cruise control activation.
Still, identifying what your car is trying to communicate can be confusing. For instance, the tire pressure warning light looks like a horseshoe with an exclamation point in the center. Many drivers may not know this is a signal from the TPMS (Tire Pressure Monitoring System), alerting you to low air pressure in one or more tires. Recognizing these icons and understanding their meaning can help prevent accidents or costly repairs.
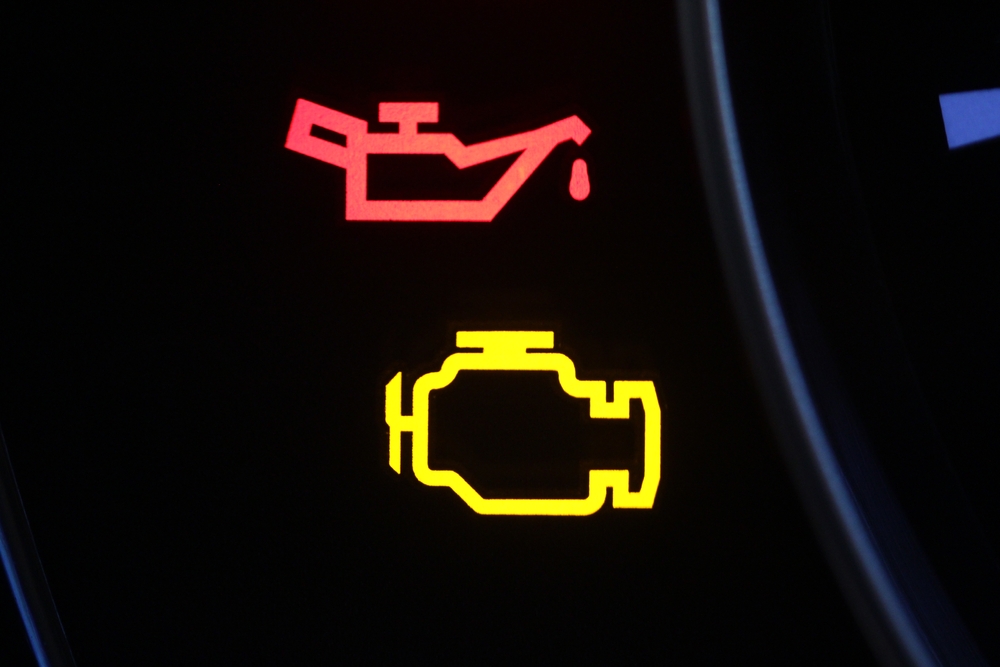
The Infamous Check Engine Light
Among all the dashboard warning lights, few inspire as much dread as the check engine light. It’s a broad warning that could mean anything from a loose gas cap to a serious engine malfunction. If this light comes on while you’re driving in La Grande, OR, it doesn’t always mean you need to pull over immediately, but you should not ignore it.
The check engine light is part of the vehicle’s onboard diagnostics system. When the engine control unit detects a problem that affects emissions or engine performance, it triggers this warning. Some cars will also display an error code that can be read using a diagnostic tool, helping a mechanic pinpoint the issue more accurately.
Sometimes the check engine light might flash instead of staying steady. A flashing check engine light is a sign of a severe issue, like a misfiring engine, which could cause damage to the catalytic converter. In such cases, it’s best to reduce your speed and seek auto repair in La Grande, OR, as soon as possible. Ignoring the check engine light can lead to higher emissions, lower fuel efficiency, and more extensive damage over time.
Common Car Warning Lights Meaning
Beyond the check engine light, your car’s dashboard is home to a variety of other warning indicators. Understanding the meaning behind these lights can help you take the right steps to ensure your vehicle remains in good working order.
The battery light, for instance, signals an issue with your charging system. This could be a dying battery, a failing alternator, or a problem with the wiring. If this light comes on, your car could lose power and eventually stall. It’s wise to get your electrical system checked out quickly.
The oil pressure warning light resembles an old-fashioned oil can. When this light illuminates, it means oil pressure is too low, which could lead to engine damage. Pull over safely and check your oil level. If it’s low, topping it up may help, but a persistent warning requires professional inspection.
Another important warning is the temperature gauge light. If it comes on, your engine may be overheating. This could be due to low coolant, a failed thermostat, or a broken water pump. Overheating can severely damage an engine, so if this light appears, it’s crucial to turn off the engine and let it cool before taking further action.
Brake system warnings are also critical. A red exclamation point inside a circle often signals a serious issue with your braking system, such as low brake fluid or worn brake pads. If this light comes on while driving, avoid using the brakes harshly and have your car inspected immediately.
When to Take Immediate Action
Knowing when to act can be the difference between a quick fix and an expensive repair. Some dashboard warning lights indicate immediate danger and require you to pull over and turn off the engine right away.
If you see the oil pressure light, overheating warning, or a flashing check engine light, stop driving as soon as it’s safe. Continuing could result in irreversible engine damage. For warning lights related to the brakes, steering system, or airbags, it’s equally important to get the vehicle checked out without delay, even if the car seems to drive normally.
In La Grande, OR, where extreme weather conditions and mountainous roads can add stress to your vehicle, ignoring these warnings may lead to a breakdown in an inconvenient or unsafe location. Trust your instincts as a driver. If your car feels different, sounds strange, or shows any signs of trouble in addition to a warning light, it’s time to seek professional help.
Getting Reliable Auto Repair in La Grande, OR
If you’re unsure about the meaning behind your dashboard warning lights, don’t gamble with your safety. Local auto repair shops in La Grande, OR, have the tools and expertise to read diagnostic codes and inspect your vehicle thoroughly. Many shops offer free or affordable diagnostic scans that can identify the root cause of a dashboard alert.
When choosing where to go, look for certified technicians who specialize in your vehicle’s make and model. A reputable auto repair shop will not only explain what the warning lights mean but also outline your repair options and costs clearly. Transparency is key, especially when dealing with complex systems like the engine, transmission, or electronic control units.
Many shops in La Grande also offer preventive maintenance services. Routine inspections, oil changes, fluid top-offs, and tire checks can catch issues before they trigger a dashboard warning. Staying on top of maintenance is one of the best ways to keep warning lights from appearing in the first place.
Conclusion
Dashboard warning lights are your car’s way of communicating with you. Whether it’s the check engine light or a less familiar symbol, each one is designed to protect your vehicle and keep you safe on the road. Understanding what your dashboard light means can help you respond appropriately, from topping off fluids to seeking immediate repairs.
In La Grande, OR, where vehicles often face a mix of weather conditions and terrain, paying attention to these warnings is especially important. Whether you’re dealing with a minor issue or a critical fault, taking prompt action can save you time, money, and potential breakdowns.
The next time a dashboard light comes on, don’t ignore it. Listen to what your car is trying to say, and if you’re in doubt, schedule a visit to a trusted local mechanic. The peace of mind that comes from knowing your vehicle is safe and sound is well worth the effort.
Need a Mechanic in La Grande, OR?
Our team here at Integrity Automotive has provided quality auto repair services for our customers since 2003. We are a full service auto repair shop and specialize many types of vehicles, including European models such as BMW and Audi, as well as diesel trucks. Our services include engine repair, transmission services, and many more services. Moreover, we are ASE certified and are a proud member of NFIB, and we are a certified NAPA auto care center. Call or come in for immediate service!
Finding a trustworthy auto repair shop can feel like a daunting task, especially when your vehicle needs immediate attention. If you live in La Grande, OR, or the surrounding areas, you already know how important it is to find dependable service close to home. With so many options, knowing what to look for when choosing an auto repair shop is essential. Whether you’re searching for routine vehicle maintenance in La Grande, OR or facing a sudden mechanical issue, understanding the key traits of a reliable provider can save you both money and stress in the long run.
The Importance of Choosing an Auto Repair Shop You Can Rely On
Your car is one of your most valuable assets, and keeping it in top condition is critical to ensuring your safety on the road. Choosing an auto repair shop that employs certified auto technicians and offers honest auto repair services makes a significant difference in the longevity and performance of your vehicle.
A reliable mechanic in La Grande, OR not only has the technical skills to fix your vehicle correctly but also communicates openly about the work being done, offers fair pricing, and follows through on their promises. When you have an established relationship with a local auto repair shop that consistently meets your expectations, you’re less likely to be caught off guard by unexpected breakdowns or inflated bills.
Certified Auto Technicians: The Cornerstone of Quality Workmanship
One of the first things to check when evaluating an auto repair shop is whether they employ certified auto technicians. Certification is more than just a title; it’s a sign that the technician has undergone rigorous training and testing to demonstrate their expertise in various areas of vehicle repair and maintenance.
Shops with certified technicians are usually committed to staying updated on the latest technologies and industry standards. This is especially important as vehicles become increasingly complex. Whether you’re dealing with advanced diagnostics, hybrid systems, or standard engine issues, a certified technician has the training necessary to address these challenges effectively.
In La Grande, OR, many trustworthy auto repair shops highlight their certifications as a mark of credibility and professionalism. ASE (Automotive Service Excellence) certification, for example, is widely recognized across the country as a gold standard in the auto repair industry. When you see this or other certifications displayed at a shop, you can feel more confident that your vehicle is in capable hands.
The Value of Local Reputation and Customer Reviews
When choosing an auto repair shop, reputation within the community plays a significant role. A local auto repair shop with a long-standing presence in La Grande, OR has likely built its business through word-of-mouth and repeat customers. You can learn a lot by asking neighbors, coworkers, or friends for recommendations based on their personal experiences.
Online research is another powerful tool in your search. Customer reviews for auto repair shops offer insight into everything from service quality and pricing to wait times and communication. While a few negative reviews are normal, a consistent pattern of complaints is a red flag. On the other hand, a long list of positive reviews praising knowledgeable staff, transparent pricing, and honest auto repair services is a clear indicator that the shop can be trusted.
In today’s digital age, most repair shops will have a presence on platforms like Google, Yelp, or Facebook. Pay attention to the specifics mentioned in these reviews. Are customers repeatedly mentioning how well the mechanics explain issues? Do they talk about fair pricing and friendly service? These are signs of a business that prioritizes customer satisfaction and values long-term relationships.
Honesty and Transparency in Auto Repair Services
Few things are more frustrating than being misled or overcharged for car repairs. That’s why honesty and transparency are non-negotiable traits in a trustworthy auto repair shop. When a mechanic in La Grande, OR takes the time to walk you through what’s wrong with your vehicle, explains the necessary repairs in plain language, and provides a written estimate before doing any work, it shows a commitment to ethical practices.
Some shops even go the extra mile by offering digital inspections with photos and videos, allowing customers to see exactly what needs attention. This level of openness helps build trust, especially for people who aren’t familiar with car repairs. It eliminates confusion and ensures you’re only paying for services that are truly needed.
In La Grande, OR, businesses that pride themselves on offering honest auto repair services tend to have loyal clientele. They understand that transparency leads to long-term customer satisfaction and referrals. This kind of shop will never pressure you into unnecessary repairs or inflate costs with hidden fees. Instead, they’ll focus on delivering quality service that keeps you coming back.
Consistent and Preventative Vehicle Maintenance
Preventative maintenance is one of the most effective ways to avoid major breakdowns and costly repairs. A dependable local auto repair shop will not only handle emergency fixes but also help you stay on top of regular vehicle maintenance in La Grande, OR. Oil changes, brake inspections, tire rotations, and fluid checks are just a few of the services that contribute to the health and safety of your vehicle.
The benefit of choosing a single repair shop for all your maintenance needs is continuity. Your mechanic becomes familiar with your vehicle’s history, can anticipate potential issues, and will advise you accordingly. This proactive approach extends the life of your car and reduces the likelihood of surprise breakdowns.
Consistency in vehicle care also fosters trust. When a mechanic demonstrates reliability through routine checkups and sound advice, you know you’re working with professionals who genuinely care about your car’s well-being. Over time, this relationship becomes a valuable asset, offering you peace of mind whenever an issue arises.
Conclusion
Selecting a trustworthy auto repair shop in La Grande, OR is about more than just convenience. It’s a decision that impacts your safety, finances, and overall driving experience. By focusing on certified auto technicians, a strong local reputation, transparent service, and preventative maintenance, you position yourself for a long-term relationship with a mechanic who has your best interests in mind.
Whether you’re new to the area or simply searching for a better option, taking the time to evaluate your choices will pay off. Read customer reviews for auto repair shops, ask around, and don’t be afraid to visit a few places before making your decision. In the end, the peace of mind that comes from knowing your vehicle is in good hands is well worth the effort. A trusted local auto repair shop can become an essential partner in keeping you safe on the road for years to come.
Need a Mechanic in La Grande, OR?
Our team here at Integrity Automotive has provided quality auto repair services for our customers since 2003. We are a full service auto repair shop and specialize many types of vehicles, including European models such as BMW and Audi, as well as diesel trucks. Our services include engine repair, transmission services, and many more services. Moreover, we are ASE certified and are a proud member of NFIB, and we are a certified NAPA auto care center. Call or come in for immediate service!